
Thank you for taking the time to visit! Today we are going to go over all the reasons “why my dryer is not heating”. First, a little bit about me. I grew up in the appliance repair industry and am the third generation to own the company. With thirty years of experience, I think I can help you solve your dryer problems.
Today, we are going to be working mostly on Whirlpool/Kenmore dryers, because they are the most popular on the market, but all dryers are similar. You will need to pull up a YouTube video on the exact procedure to get into your dryer.
#1 Why my Dryer is not Heating
First and foremost, this is most commonly overlooked and what I find 25 to 35% of the time. Does your dryer have the correct voltage? Your dryer will run without the correct voltage, but will not heat! Let’s explain that. Your dryer needs 230 volts to work correctly. That requires two 115 volt leads making 230 volts and a ground. You can lose one 115 volt lead and your dryer will still run, but it will not heat. Thus the reason it is so commonly overlooked. Everyone thinks if the dryer runs, it has power.

*Caution! Dangerous voltage present!*
To check the voltage to your dryer, you will need a multimeter. They can get very expensive, but a cheap one (under $15.00) will do the job just as well. Set it to AC Voltage and check between the outside terminals. You should have 230 volts there. Now place the black lead on the middle screw and check the two outside screws with the red lead. You should have 115 volts on both of them. If you don’t, you have a problem with the electricity to the plug and not a dryer problem.
#2 Reason Why my Dryer is not Heating
Is your dryer actually not heating, or just taking too long to dry? This probably should have been first on the list. When it takes 2-3 cycles to dry a single load of clothes, most people just say their dryer is not heating. Start the dryer empty of cloths and let it run for 5 minutes. Open the door and feel inside. If it is warm to hot, your dryer is heating and not the problem. (Granted, there are a few very rare cases that can still be the dryer, but we are covering the most common here today).
Now you need to look at the vent. First, check the piece of vent connecting the dryer to the wall. Make sure it is straight and the dryer hasn’t gotten pushed back and crushed it. Next, where does that pipe in the wall go? If it goes straight out, go outside and make sure the vent hood isn’t smashed in by the mowers or clogged with lint. Most of the time, I see them going up into the attic and through the roof. Yes, ALL manufacturers say that is OK, but a dryer was meant to sit on an outside wall and blow straight out! It was NEVER designed to blow lint 20-30 foot up a pipe through the roof!
If you discover your vent is going up through the roof, that needs some additional attention. There are several variations of dryer vent assist boosters that can be installed in the duct going through the attic. The booster will suck the lint out of the dryer and vent and help blow it out the roof. This is a MUST for any vent that is ducted through the roof!
On to More Technical Things
If the above steps didn’t solve the problem, keep reading. Now we will get into the more technical issues. The next step is to remove either the rear or front panel depending on your exact model. Again, use YouTube to see exactly how to open up your dryer.
Check the Heater.
This is the next step in the process. Remove one of the large red wires from the heater after making sure the dryer is unplugged. Set your multimeter to ohms and touch each side of the heater. If you get resistance, the heater is good and not the problem.
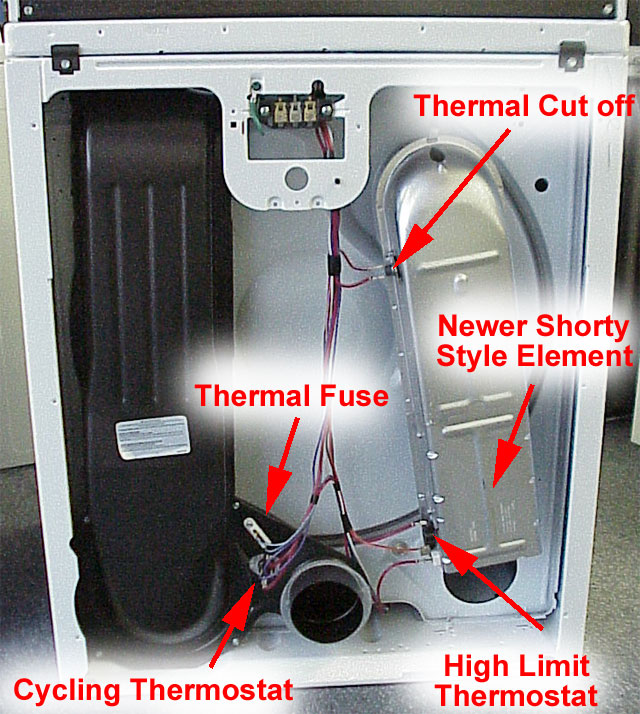
Check the Thermostats.
Just like the heater, remove one wire checking the thermostats one at a time. The thermal cut-off pictured at the top of this model is a known failure point on most Whirlpool-built dryers. The high limit and cycling thermostats can go bad, but that is actually rare. When you get to the thermostats, you may find more than two wires connected to them. In this instance, there will be two larger wires and one to two smaller wires. Always check between the two larger wires and ignore the smaller ones.
Check the Motor and Timer.
You will need to USE EXTREME CAUTION here because we will be dealing with live voltage on a running dryer. Remove one of the large red wires from the heater and bend it toward you so it can not touch anything. You can look at where the wires go to tell which comes from where. One will go down and inside the inner panel, this is connected to the motor. The other will head up and eventually makes it’s way to the timer.
Double-check to make sure the wire you removed from the heater is still pointing towards you and can not touch anything. Now plug the dryer in and start a normal drying cycle set to high heat. With your multimeter set to AC voltage, VERY CAREFULLY hold the black lead to the silver heater housing for a ground. Next, touch the unconnected wire that is sticking out with the red lead, then touch the other wire still connected to the heater. You should read 115 volts on both of the wires.
Timers: What to Look for.
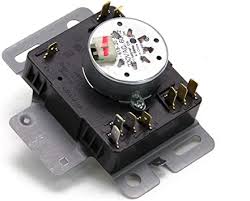
If your timer looks similar to the one pictured here, it will have two large white plugs with three or four wires in each of the plugs. This is a cheaply made timer and a known failure point in later model Whirlpool dryers. If you did not get 115 volts earlier on the red wire going up to the timer, this puppy is going to be your problem. After replacing it, make sure you and anyone using the dryer ALWAYS turns the knob clockwise. Most people only use one cycle and turn the knob backwards to the beginning of that cycle instead of going all the way around. That habit will break this timer.
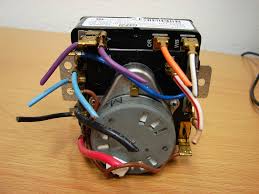
If you find this type of timer in your control panel, it will have multiple individual wires plugged into it instead of two large plugs. This is an older timer and rarely goes out. If you did not get 115 volts on the timer wire, it starts getting much more difficult to trace down the problem and should be handled by a qualified technician. Yes, the timer could still be bad, but it takes extensive knowledge of the wiring and all the controls in the panel to diagnose this problem.
I Did Not Find a Problem, What’s Next?
Unfortunately, if you did not find a bad part in the steps above, it is time for a trained appliance technician. Going any deeper into the control panel or wiring takes extensive knowledge and training to track down the problem. Sorry guys, I’ve done my best to save you some money and repair the dryer yourself. But, if the above steps did not solve the problem, it’s time to shell out the cash for professional help.